Table of Contents
How to Add a Gradient to an Image and Text in Photoshop ?
In this tutorial, we will learn about Gradient Feature in Adobe Photoshop, and we will see how to add a gradient to an image and text in photoshop.
Frequently Asked Questions
By the end of this tutorial, students will be able to answer the following questions and also will able to perform the practice successfully in adobe photoshop.
- What is the Gradient?
- Different types of a gradient in Photoshop?
- How to add a gradient to an Image in Photoshop?
- How to add Gradient to Text in Photoshop
Let us start with Gradient’s introduction.
What is Gradient ?
A gradient generally refers to the effect that eases a smooth transition between two adjoining colors or shades.
In context to color image processing, the Gradient tells about a range of colors that are independent of the position. These colors are used to fill an area of the Image.
In Adobe Photoshop, the Gradient is an effect that can be view as merging of one shade, color, or brightness into another.
Gradient helps us to add eye-catching and flashing graphics. So Gradient is widely used in web design, and Gradient is applied to modify the color of an image or enhance them to create a customized version of the Image.
In Adobe Photoshop, Gradient Tool can also be used to create some virtual shadows. By appropriate use of this Photoshop tool, we can move the Gradient clockwise, anticlockwise, or in an irregular direction.
This tool also provides the facility to apply the different colors together, and we can place them in the appropriate sequence. For example, we can make a line and trace the direction of the Gradient.
Types of Gradient in Photoshop
In Adobe Photoshop following types of Gradient are available.
This toolbar has the options for the following Gradient in Adobe Photoshop.
- Linear Gradient –If one color merges into the next color linearly, then a linear gradient is formed.
- Radial Gradient – If the transition from one color to the next color circularly occurs, then a radial Gradient is formed.
- Angular Gradient– When color transitions occur in a counterclockwise direction from the point of start, then angular Gradient is formed.
- Reflected Gradient – If the colors progress the outer side from starting at central and progress in a symmetric manner, then the reflected Gradient is formed.
- Diamond Gradient- Colors transition takes place from the point of start outward in a diamond fashion.

How to add a gradient to an image in photoshop ?
Following steps are used to use to add gradient to an image
- First we open the image to which we want to add gradient.
- Select the Fill option on the top left window and select the gradient option as shown in Figure 1.
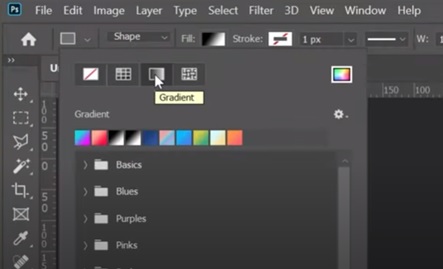
Figure 1: Gradient Option in Photoshop
3.Click on Layer and double click on thumbnail as shown in Figure 2
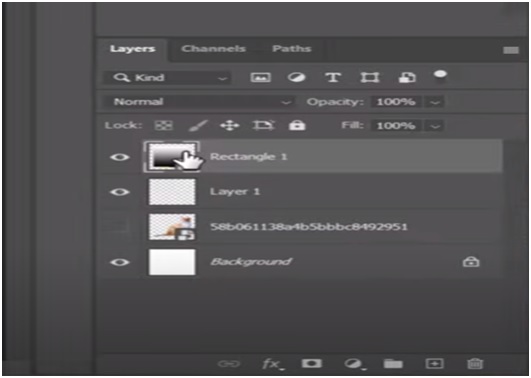
Figure 2: Layers Option
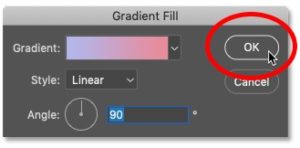
4.A Gradient Fill dialog box will appear as shown in Figure 3
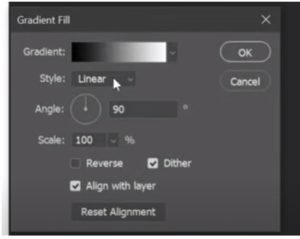
Figure 3: Gradient Fill Dialog Box
Following option are available in this dialog box. Using this we can change the style of the gradient from linear to other type like Radial, Angle, Reflected or Diamond. By default gradient style is linear.
We set appropriate value of all these parameters.
5.First option in gradient window is for Gradient Color.
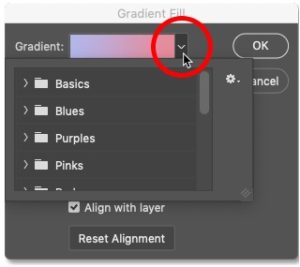
In order to select another gradient from the gradient fill dialog box we can click the arrow to the right of gradient swatch as shown in figure. Then click the OK when we are done to close the gradient fill.
Second option is of Gradient Editor. When we click on Gradient instead of clicking arrow right to the gradient the then Gradient Editor window is appeared. Gradient editor is as shown in Figure 4.
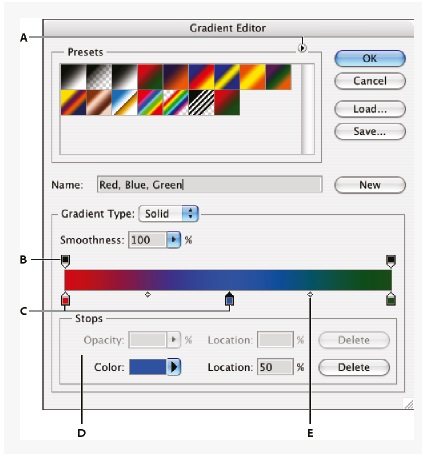
Figure 4: Gradient Editor Dialog Box
Different panels ( A, B, C, D and E) available in Gradient Editor as shown in Figure 4 are as follow
A . Panel Menu
B.Opacity stop
C.Color Stop
D.Adjust Value or delete selected opacity or color stop.
E.Mid point
After making the appropriate setting of all option click on OK Button.
Gradient is now added to Image
Add Gradient to Text in Photoshop
We can also add Gradient to Text in Adobe Photoshop. Following steps are used to add the gradient to the text in Photoshop.
(1) Add text
Click on Text tool icon as shown in left side in and create some text. Go to the toolbar and we can press “t” on keyboard. Then we right-click the mouse to which type of tool we want as like Horizontal/Vertical etc. This is shown in Figure 5.
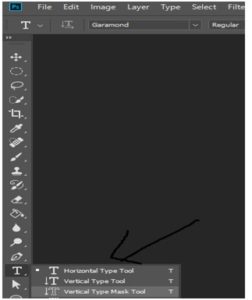
Figure 5: Icon for Text in Photoshop
Then we press Left-Click on the mouse where we want to edit and type the text.
(2) Prepare Gradient
Select all text and choose which format we want as shown in Figure given below. As we have selected the text welcome as shown in following figure.
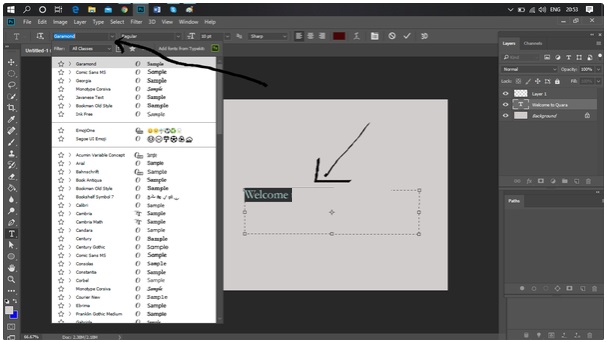
(3) Apply Gradient
Double click at Layer or Right Click on Layer then select Blending Option. We right click at the text layer to generate a text gradient.
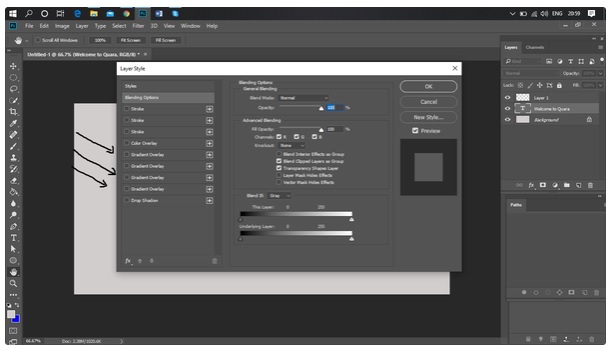
Select Blending options at the top of the list. Then we look Gradient Overlay option at the left side of the pop-up and we don’t check the box. Instead of it we click the + button.
Now the gradient overlay option is appeared on the right side of the pop-up. Click on the dropdown menu next to Gradient.
We can select the simple two-color gradient using the foreground and background colors, or we can choose one of the default gradients or a gradient that we’ve added previously.
We can also adjust other options, such as Style and Angle.
Conclusion and Summary
We hope that at the end of this tutorial, students students will be able to add a gradient to an image and text in Photoshop.
Students can also answer Gradient’s basic questions in Photoshop, such as the introduction of Gradient, types of Gradient, and adding Gradient to an image and text using Adobe Photoshop.
I hope that this Adobe Photoshop tutorial will help computer science students understand the basic concepts of gradient and gradient tools in Photoshop. Students can also add a gradient to an image and text in Photoshop after reading this tutorial.
Your feedback is precious for us. Please give your feedback or leave a comment to improve the quality of our tutorials and provide tutorials as per your expectation.
If you find this page useful, then please Like and Share the post on Facebook, Twitter, Linkedin through their icons as given below.
Next Photoshop Tutorial – How to make image colors more vibrant ?


